How to repair motorcycle plastic

How to repair motorcycle plastics

Reader Disclosure

Our editorial content is reader-supported. If you click on some of our links, we may earn a small commission.
Learn more here.

Many modern motorcycles are replete with plastic panels to give it an aesthetically beautiful look, improve its aerodynamics, and protect critical components. In order to protect these parts from damage, these modern day polymers are made flexible and resistant to shock, but even then, a fall or an accident can damage the body. In such cases, the manufacturers offer to replace the plastic part with a new one, which costs a lot of money.

It is quite common for a motorcycle to fall. The question is not about when this will happen, but how exactly. Your bike can be damaged at high speed, while driving around the city, or even in your own garage. The more plastic on the motorcycle, the more expensive it may be to repair, thus, more problems the owner will have. This plastic body can be purchased used or new, but it is not always possible to quickly find the right parts for a particular model. However, rebuilding the plastic of a motorcycle is a simple process that may help to reduce the cost. So in today’s topic we will discuss how to repair the plastic body or a fender of a motorcycle at home.

When Should You Repair Motorcycle Plastic?

First of all, it is worth determining the degree of damage. With the proper approach, you can restore a completely broken part, but sometimes it will cost at the level of buying a new one. If the damage is relatively minor and refers to a structure that does not carry a critical load, such as a part of a motorcycle body, then cosmetic repair methods are suitable.

Repair Motorcycle Plastic

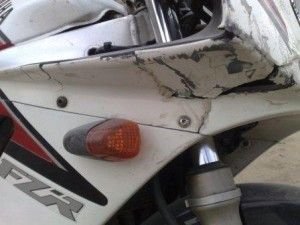
Cracks, chips, and gluing of several pieces of plastic can be carried out using a hot air gun or a soldering iron. In cases where the plastic can no longer be repaired by patching or gluing, it is possible to make a part from scratch. To do this you will need to carefully study the whole process of molding, have a lot of patience as well as invest a lot of time. Often, in such cases, it is easier to buy a used part and repair it or buy a new plastic body all together.

Repair Using Heat Gun

To repair the plastic of a motorcycle with heated air, you will need a blow dryer with a temperature controller. You can use the cheapest device, but then there is a risk of overheating the plastic, which will lead to the loss of its basic properties. Overheated material will be brittle and may break when vibrated from driving on normal roads. You will also need a special nozzle with a thin head, about 5-8 mm.

The most common device due to its simplicity is a handheld welding gun or heat gun for soldering plastics. The ergonomics of devices of different brands are different, so is the power.

Plastic welding using heat gun

Well-known brands set higher prices for blow dryers; you can find cheaper ones online. But in any case, the principle of their work remains unchanged. They melt the solder and the edges of the elements, connecting them together with an inseparable joint.

This device got its name because of the similarity with the usual household hair dryer. The difference between them is only in temperature. The welding gun creates a temperature stress of up to 300°C.

In addition to the heat gun, you will need a large piece of plastic identical to the one being welded. To do this, you should pay attention to the markings of the part, most likely in front of you there will be a product of the PP, RA or ABS brands. Polypropylene PP, for example, melts at 150°C, and starts burning at 176°C, so it should be welded at a temperature of around 148°C to 170°C. Polyamide or PA should be welded at 210°C to 237°C, and ABS at 182°C to 200°C.

Tip: If there is no inscription to help you identify the plastic type; take a lighter and set fire to the corner of plastic somewhere in an inconspicuous place (just a little). ABS has a sweetish pungent smell; whereas PP smells similar to a wax candle

Soldering process:

  1. For convenience sake, remove the part from the motorcycle and wash it for dirt and oils.

  2. Now clean the edges of the parts with medium-sized emery paper, align the edges, and try to make a cavity in areas close to the surface.

  3. If you weld the parts one by one, some sections may twist and it will be impossible to achieve a flat surface that is in alignment with the rest of the plastic body. So make sure you weld all the chipped parts together by properly supporting the base from several places (If the plastic twists initially, then for the ease of working, you can fasten it with staples).

  4. From a piece of plastic (make sure that the properties of this sample plastic match with your motorcycle’s plastic body), cut out a strip, 0.8 – 1.5 cm thick, this will be your solder.

  5. From the edge of the crack (it is better to start from the inside) start heating the joint. As soon as it begins to melt, direct the stream partly to the joint and partly to the solder. While the melt is filling the joint, gently press the area with a flat screw (make sure you are wearing gloves).

  6. When the joint is ready you can start working on the front part. If you have done it right, the inner joint will give the piece of plastic enough stiffness, so the outer repair will be more of a cosmetic nature. The process itself looks identical; the exception is the solder strip, which should be made thinner.

  7. After the welding of the front part is completed, the plastic should be cleaned and, if necessary, a coat of paint should be applied to it or a style-appropriate sticker should be used to cover the defect.

Repair Using Soldering Iron

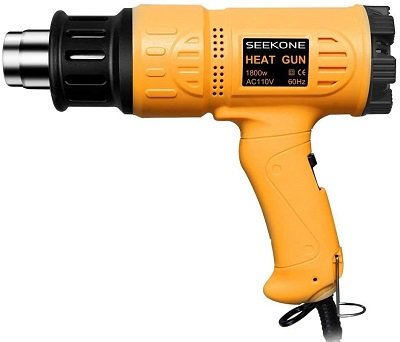
Apart from the tools that are used, this DIY method is practically no different from the previous one we have discussed. You will need a high power soldering iron (click to buy) that has an inbuilt temperature control. Here, too, the type of material to be welded and the befitting solder are important. The latter can be found in the form of special ribbons in stores.

Welding process:

  1. Dismantle the part, wash it for any dirt, clean the edges with sandpaper and degrease it.

  2. Put together all the broken pieces and align them properly.

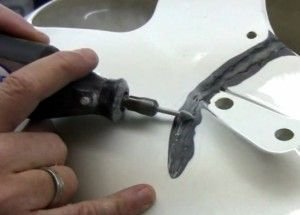
  3. Now grab the broken plastic and start welding from the inside using a soldering iron (make sure all the welding is carried out only in the inside of the plastic).

  4. Starting from the edges, we hold the soldering iron against the joint and pour the melt gently inside the cavity.

  5. Now the plastic parts are sticking, but they are not yet firm enough. The next step is to apply a new layer, and to do this, melt the solder with the soldering iron near the cavity. While the solder is still liquid, flatten it to get an even layer.

This process will take much longer and require more patience, but the layers of plastic will hold better, which means that the joint will be more durable. If you do everything as per procedure, then the repaired plastic body will have a strong joint, which will look rough from the inside, but the outer area will be perfectly flat.

repair using soldering iron

Note: Some people advise using reinforced metal mesh for reinforcement. This option only makes sense if you are working with fragile, poor quality material that is not capable of bending.

Repair Plastic Using Epoxy

Repairing the plastic of a motorcycle can be done by gluing the parts together. For this we need:

  • Epoxy resin and Hardener (buy here);
  • Fiberglass;
  • Gloves;
  • Castor oil.

Bonding process:

  1. Firstly, remove the defective part, thoroughly wash it with hot water, and then clean up the area around the cracks and the ends of the chips.

  2. Once the broken plastic has dried, degrease it completely.

  3. Next, dilute the epoxy resin with hardener; keep in mind that the solution will stay in a liquid state for 2-4 hours, so it is better to mend areas one by one. If you add a little castor oil to the mixture, the joint will look more like as a plastic itself.

  4. Now apply the mixture from the inside with a brush in one layer.

  5. Next, put a layer of fiberglass no more than 5 cm wide and cover it with another layer of glue. In total, you should get 3-5 layers of mesh, and the final layer is glue (this entire process should be carried out in gloves and safety goggles).

  6. After work is completed, leave the part to dry for a day at room temperature. A sign of success is the disappearance of glue and the strengthening of the structure. You can apply light pressure to the joint to check its strength (make sure the material is set).

  7. If everything seems okay, the repair is complete; otherwise we completely remove the layer and apply a new one.

  8. There is still the outer part that needs to be treated, but it will be done by applying a putty to hide the damage, which will then be painted over.

Making Replacement Part

When talking about restoring motorcycle plastic, we should not forget about the complete replacement of missing or damaged parts. Here we divide the process into making the entire panel from scratch or making the damaged piece for replacement. The hardest part is to make the part yourself. It is possible to completely replicate the factory molds only with fiberglass. The process is very long, not the cheapest and is suitable only for enthusiasts.

  1. To do this, first, you need to prepare a mold exactly as your damaged part. A layer of fiberglass and resin should be gradually applied to this mold, thus forming the part.

  2. The piece is then sanded, primed and painted. Such a part will last exactly until the next accident, because fiberglass is very fragile, and its repair does not make sense because of the loss of rigidity of the entire structure.

  3. Alternatively, plastic repairs can be done with a sample piece of plastic that is similar in composition and size. From this plastic work piece a shape should be sawed that looks similar to the missing part. This method is suitable for straight sections or with a slight spherical bend. The bend can be obtained by heating the piece, shaping it and fixing it until it cools.